Saturday, September 27, 2014

Building Definitions, Bongard Style

In Geometry, I always find it difficult to get students to communicate the "Why?" or the "How do you know?" part of their solution.  At a very basic level, I believe that this is why traditional two-column proofs are so challenging for students; they are rarely asked to defend their reasoning in a math class. As I mentioned in a previous post, I've been doing a lot of things surrounding vocabulary and definitions this year, and I have been pleased with the results.  Students are starting to defend their solutions with statements like, "By the definition of midpoint, I know that segment AB is congruent to segment BC."  I believe that this transition is greatly attributed to the fact that they were given the opportunity to build on their own understanding and definition of a term, I just helped solidify it and give it a more academic spin.

What is a Widget?

My colleague and friend Amy Zimmer (http://zicker63.blogspot.com) shared an image with me at the beginning of the year that comes from the Discovering Geometry textbook (see below).  The goal is for students to develop a definition of a Widget based on the pictures provided.


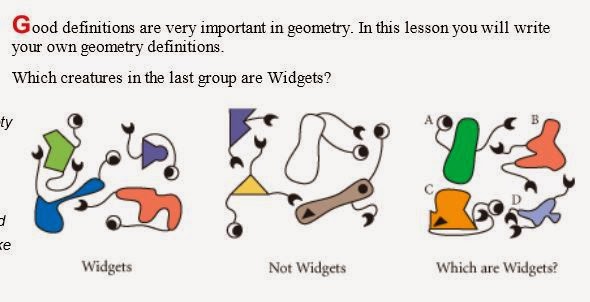
I displayed the picture on the board and asked students to quietly observe what they thought a Widget might be.  I asked them to be mindful of the characteristics that they were looking for to establish their definition.  After a minute of solo think time, I had students turn and talk to a partner about what they were noticing and what their initial ideas were for what it meant to be a Widget.  I called on a few students to share the characteristics they were considering, not to share their definition just yet (see list below).

Once the class agreed that we had listed all of the characteristics that were important, or even ones that didn't end up being relevant, we started to use those to refine our definition.  I had students turn and talk to their partner again to formalize their definition and I asked them to share it out with the rest of the class.  I wrote notes on the board and our definition was born.


Once we had our definition, we tested it on the "Widgets" and "Not Widgets" from the picture to make sure it held true and that we had not overlooked anything.  The last step of the process was to see which of the four images (A, B, C, and D) were Widgets.  Without having to ask, students were able to say Yes or No and provide a reason why.  I asked, "Is A a Widget?" and students responded with, "Yes, by our definition, A is a Widget."  When I asked, "Is B a Widget?" students said, "No, because it does not have exactly one eye and one claw."  It was obvious that they actually appreciated the concrete set of rules that they had developed in defending their answer.

In two of my classes, the rule about the eye and claw was not immediately as precise as "Exactly one eye and one claw".  Students had said something about they had to have eyes and claws.  When we looked at picture B, it required us to go back and revise our definition, which was so wonderful to show them that our first draft did not need to be our final draft.

It is my guess that for most students, this kind of abstract reasoning is not happening very often.  When students think about definitions, they probably think about their English class and having to look up words in a dictionary.  I wanted to show them that using definitions is an acceptable way to build an argument and that those definitions and arguments could be even stronger if they were given the chance to build them based on their own understanding.

Bongard Problems

Dr. Patrick Callahan (Co-Director of the California Math Project) had shown me these problems a while ago and I was recently re-inspired when I saw him share them with a group of teachers in Fresno during a professional development session.  Here is a slide from Dr. Callahan's Power Point:


A Bongard Problem is a collection of 12 images where the 6 on the left hand side all share a characteristic (or characteristics), and that characteristic is not present in any of the 6 images on the right hand side.  The task for the reader (or student in my case) is to determine a rule that works for all images on the left, and none on the right.  Here is an example (also taken from Dr. Callahan's PPT):


Can you figure out the rule?  This one is fairly easy.  Spoiler Alert!!!  All images on the left hand side are triangles and none of the figures on the right hand side are triangles.  Try this one:


Here's what I love about this particular problem (it's #4 on the website) -- students might not know the words concave or convex, but what so many of them pick up on is that the images on the right hand side are all "sunken in", or "have a bend in them", or even that they have a "part missing".  They notice that all of the images on the left hand side are "pushed out" or have "nothing missing".  This is exciting because it's an opportunity to build on what they already know and can observe about a figure to then introduce the more formal term for these ideas (concave and convex).

When I first introduced these to my students, I shared these two, along with some others that were more challenging.  What I found interesting was that there wasn't a sense that I was the one who held the answer.  Students had already picked up on the fact that they could check to see if their rule held true just by looking at the images on the left and the images on the right.  I know that some teachers struggle with the idea of not being the authority in the classroom in terms of knowledge, or having the answer, but this happened so naturally that I actually addressed it with my students.  I wanted them to acknowledge that they had the skills to be able to answer the question "Does that work?" or "Is that right?"  They learned very quickly that the responsibility of coming up with a rule fell on them, not on me.


For homework that night, I had students create their very own Bongard Problem.  I wanted to see what they would come up with and how creative they would be.  These are some of my favorites.  Which ones can you figure out the rule for?


And Now What?

I wanted to continue with this work because I feel that the use of definitions is something that we can rely on throughout the school year.  But, I wanted to formalize it and see if I could help students organize their thoughts with a template or structure that allowed them to articulate their thoughts more clearly.  This is what I came up with:

When I introduced the template, it was clear that students were a little apprehensive to write anything down because it seemed so final.  But with some practice, they realized that it was a work in progress and that they could take the risk of not having it perfectly stated the first time.

I asked a random student to pick a number between 1 and 100 (the number of problems that Bongard wrote) and in my first period class, the chosen student selected 94.  So, we looked at Bongard Problem #94:

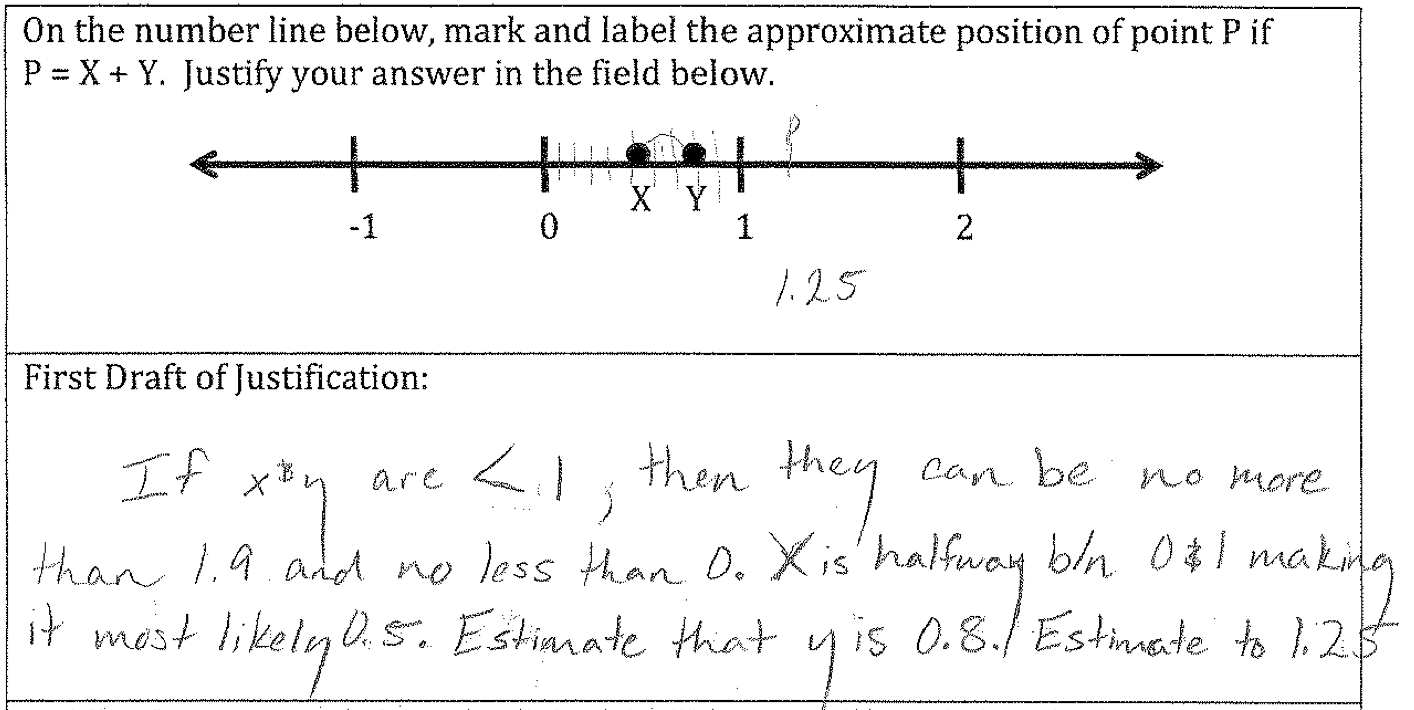
This ended up being a great one to address precision of language.  Students realized that a subtle difference in wording could actually mean something that they did not intend to say.  With the template, students were given individual think time to develop their own rule and write ideas down, then they could turn and talk to a partner to refine their rule and perhaps see things they had not initially observed.  After about 2 minutes, I selected a group at random to share their rule with the class.  I gave them one minute to come to consensus as to what I would write on the board.  Once I had their first draft of a rule written on the board, it was the job of the rest of the class to brainstorm feedback or clarifying questions for this particular group.  It was not an opportunity for a new group to share the rule that they come up with for us to compare.  I said that we were committed to helping this particular group come up with the best version of their rule as we could.

Students provided feedback on things that surrounded the precision of language.  They referenced the actual picture to defend why they thought their feedback was important.  If the first draft of the rule said "The black dot is not at the end of the string of dots", students might ask for more specifics of the black dot's location in regards to the white dots.  Or, if the first draft said "The black dot is between 2 white dots", students might ask about the image on the left hand side that is on the right in the middle row.  This elicited more precision of language such as "between at least white dots", etc. 

Here are some student work samples of how they worked through the process of writing a rule:


We did five of these Bongard Problems as a class over the course of about 3 weeks.  I would start class with them, almost like a warm-up.  I especially like how this practice went along with the first unit in our textbook, which is very heavy with new terminology and vocabulary.  It was nice to have an example separate from the textbook to use that showed the importance of developing a definition to build an argument.  I am excited to see where this takes us in our next unit on transformations!

Lastly, I wanted to share some pictures from the last Bongard Problem that we did as a class.  These come from the three sections of Geometry that I teach, and I wanted to capture the original rule and the result of giving feedback and modeling revision that I used with my students.

The Bongard Problem was #58:

And here is how students developed their rule:


I would encourage teachers to use Bongard Problems in their classes to help students build a foundation for using definitions and understanding the importance of precision of language.  There are some Bongard Problems that are quite challenging, but for the most part, I have found that students enjoy the puzzle element of finding the rule and are willing to take the risk of being wrong the first time.  I have seen growth in their reasoning skills and I am encouraged by their perseverance and overall willingness to try and work hard.

Wednesday, September 10, 2014

Redefining Geometry Vocabulary

It's no secret that a high school Geometry course is riddled with wordy, complex definitions for terms that students inherently know something about based on life experiences.  The struggle for a teacher is how to access that prior knowledge and make connections to the Geometric concept?  In the past, I have been the one to define the terms for the students, simply using the definitions from the textbook, thinking that those would be the most accessible to students.  Surprisingly, this was largely unsuccessful.

A few weeks ago, I read a blog post by Lisa Bejarano (Check it out here) where she spoke about similar struggles to provide access to students in the realm of Geometry terms and definitions.  The element of her blogpost that was the most inspiring to me was her use of examples and non-examples for each term.  I was also inspired by a colleague from High Tech High in San Diego who had created an activity that included an element of revision that I found very interesting (see sample below).

Headings: Word, Student Generated Definitions (words & images), 
Exact Definitions (words & images)

Together, Lisa and Jade inspired me to develop an authentic way for students to acknowledge what they already knew about a term or concept, but then also have the perseverance to learn more and build understanding.

I began with the first section in my textbook, and I listed all of the key vocabulary terms.  The list included point, line, plane, collinear, coplanar, segment, endpoint, and ray.  (The old me just fell asleep thinking about having to teach these terms) :) I created a chart that was similar to Jade's, but also brought in elements of Lisa's activity by addressing examples and non-examples (see sample below).

Headings: Word, Student Generated Definition (words/images), 
More Precise Definition (words), Picture, Non-Example

I gave each student a copy of the vocabulary chart and asked them to read through the list of terms, checking in with themselves about what they already knew about the word or concept.  They had the choice to write down their thoughts or not, but if they wanted to, they would do so in the "Student Generated Definition" section.  Next, students turned to their peers (at their table groups) and shared what they already knew about each term, again they had the choice to write down what they wished.

This is what I had written on my whiteboard as a reference after they had time to think independently:


The next stage of the activity involved students getting up and moving between tables where I had distributed strips of paper with examples and non-examples for each term (see sample below -- THANK YOU LISA!!!).  Students were asked to study the pictures in the two categories and record what they needed in their vocabulary chart.  If they needed to draw all of the pictures, that was fine, if they saw some were redundant, I left it up to them to choose what to include.


Please note that these pictures are computer generated, but the ones I created for my students were drawn by hand, so they looked slightly different.  For example, for the line pictures, I had more about labeling and I included points on the lines, etc.


What I found during this piece was that there was not a lot of discussion happening.  Students were traveling around the room simply copying the pictures as if that was the most important part.  So, what I did was I actually asked them to move around quietly as they observed and copied pictures; no talking.  I don't know why I thought to do it this way, it just seemed like a battle that I was not going to win if I kept asking them to talk, talk, talk.  It just seemed so forced.

So, when they were done checking out the pictures, I asked them to return to their seats and told them that they were not allowed to have their pen or pencil in their hand, that drawing and writing time was over for a little while and that this was now time for discussion.  I think by defining the time more clearly, it allowed for students to focus on one element of the activity at a time.  Sure enough, students began brainstorming what they thought was an appropriate way to define these terms.  They were building on each other's ideas, they were referencing the pictures, and they were accessing their background knowledge.

Once discussions began to die down, I invited them to write their updated versions for each term, still in the "Student Generated Definition" section.  I was pleased to see that students who chose to write something right off the bat were not afraid to revise and make their definitions better.  Students were open to learning from each other and building on each other's ideas.  This, however, is an area where I believe they can still grow.

Often times when I ask my students to discuss an idea and I leave it open ended, it's not much of a two-way conversation, but more of a "I did this..." and "I did this..." from student A to student B and vice versa.  They are still learning to engage in a conversation, not just telling each other what they did.

At this point, I was out of time for the period, so had to make a decision about what to assign for homework.  Any Geometry teacher will tell you that the first section of the book is often times an exercise in learning, recalling, and using the Geometric vocabulary that we have discussed above, so I thought, Why not see how and what they do with it?  So, I assigned 12 problems from the first section that involved everything from drawing pictures that used these terms, using the terms in ways to describe a picture, identifying these terms from a picture, and so on.  I was hopeful that things would all sort of "come together" for them when they were given an opportunity to practice.  I knew that I was risking the possibility of students solidifying an incorrect definition of a term, but I was confident, based on my observations, the opportunities to work with their peers, and access to the formal definitions in the book, that there was sufficient support for them to be successful.

When students returned to class the next time, I was pleasantly surprised by how well they were able to use the vocabulary terms in an appropriate context and when checking the homework, there were very few questions that were raised.  After reviewing the assignment, I did take the time to provide students with a "More Precise Definition" that was a balance of the textbook definition, items involving notation, and an approachable way to think about the term.  But, before I provided them with the more precise definition, I asked for them to share with me (and the class) some of the things they wrote down.  It was fun to hear how they described certain things: "a ray is half a line", "collinear means together on the same line", because it was obvious that they had made sense of the term, but perhaps didn't have an "academic" way of defining it.  That's where I could help extend their learning, not stifle what they authentically know.

It's been about a week since I did this activity and we have since moved on to discussing things like the Segment Addition Postulate and the construction of copying a segment  For the first time in my 9 years of teaching, I have found that students are willing to and comfortable using the Geometry vocabulary from the activity.  We are looking at problems that involve the use of the vocabulary and students are using them accurately.

Here's a perfect example:

Holt Geometry

After posing this question to my students, some of them asked clarifying questions like "Are these points collinear?", "Can we think of this freeway as a segment?  Or is it more of a line?", "Which towns are the endpoints of the segment?"

The last thing that I will say about this set up for teaching and learning vocabulary is that I'm finding that if a term comes up in class that they are still not quite sure what the definition is, they are so comfortable with opening up their binder and taking out their chart.  In the past, when I have taught the definitions of these terms as a part of their notes, they never return to them again.  I think that this is another strength of the chart and activity as a whole.  Students have interacted with the words and they hold on to that experience in a way that I have not seen in the past

I can't wait to hear about your ideas for how to make this activity even better!  And again, thank you to Lisa Bejarano and Jade White for the inspiration!

Monday, September 1, 2014

"Where Do I Put P?" An Introduction to Peer Feedback

"Construct Viable Arguments and Critique the Reasoning of Others" is a new expectation for students that is proving to be challenging for them, and for me.  How can I offer students opportunities to do this without just asking them to "give feedback"?  They don't necessarily know how to give and/or receive feedback, so what structures can I put in place to help them be more successful?

I have used this problem from MDTP (http://mdtp.ucsd.edu) in the past as a whole class activity.  Students think about the problem independently, then discuss as a table group, and finally share with the whole class where they would put P.  I would draw the number line on the board and a group member would come up and place a magnet on the line that represented the position of P.  (Forgive the formatting - for the life of me I could not get the points to rest ON the line)


I chose to introduce this problem a little differently this year.  I gave this task to the students using a template that Dr. Patrick Callahan (Co-Director of the California Math Project) had shown me.  The template is designed to offer students a structure and process for providing and receiving feedback.


I knew that if I just gave this paper to students and said "GO", they would have felt very unsuccessful and discouraged, so I knew I needed more structure.  I have found that the more explicit and transparent that I can be with my students, the more likely they are to try and persevere.  Here is what I had written on the whiteboard:


We acknowledged that this was a new process for everyone, but that it was acceptable and expected to not have it perfect on the first time (notice what is written in orange).  I read these expectations to my students at least 4-5 times throughout the lesson, reminding them to try hard and stick with it.

So, that's how I was building the culture and expectations of providing feedback, but I felt that they would also benefit from some specific examples, so here's what I wrote:


And with that, we were on our way.  Here's how the lesson flowed...

Step 1: Students write their own individual argument in the "First Draft of Justification" box.

Step 2: I had students turn to their neighbor and read their argument to see if it made sense when read out loud, also this was the first chance that students had to share their argument (practice, practice, practice).  The partner was required to provide some sort of verbal feedback to their peer (sentence starters on the board) and the student who just read their argument was given the opportunity to edit their first draft if they wanted to.

Here's an example of a pair of arguments from students who were working together:


Step 3: The other partner reads their argument, just like the first student.  Then, as a pair, they decided whose argument would be shared with another pair to receive feedback.  I did not give any suggestions as to what criteria should be considered when selecting whose argument should be selected, it was totally up to them.  The reason that I had one argument from each pair "travel" to another group is because I wanted students to practice giving written feedback as pairs, not as individuals.

Step 4: I chose a random piece of student work (avoiding the disclosure of the name) to put under the document camera.  As a class, we read the argument and brainstormed possible feedback that would be useful.  How could we help this student make their argument clearer, more viable, or more logical?

Here are some that I chose to start the discussion:


Step 5: Students held up the paper that was to be sent to another pair, and I came by to grab them.  I distributed one new paper to each pair and students began reading the arguments.  Students consulted the whiteboard to see what sentence starters would be appropriate for providing written feedback on this particular argument.  Together as pairs, students provided feedback on the first draft of the argument.

Step 6: Again, I chose a piece of student work at random to put under the document camera so that we could discuss the feedback and how it related to the "Feedback Expectations" I had written on the board.  This time we considered if the feedback was useful, we were not as worried about the first draft of the argument.

Here are some samples of feedback that we looked at:


Step 7: Essentially, we repeated Step 5.  This time, when students got a new paper they were reading the first draft of the argument and the first round of feedback to see how they could build on the story.  What new feedback could they provide?  I was very clear that it was unacceptable to just write "ditto" or "what they said".  I pushed them to think of new feedback or a suggestion that would build on the existing feedback.

**When I have shared this template with other teachers, they have suggested that I reformat it so that it goes First Draft, Feedback #1, Second Draft (meaning the owner of the paper gets it back after the first round of feedback to revise their argument), Feedback #2, and finally Final Draft/Revised Version.  I have not tried this yet, but it would potentially help with the "ditto"/"what they said" issue.

Step 8: I repeated Step 6 except now, we were looking at the whole "story" as it unfolded to consider what worked and what didn't.  What were some good examples of meaningful and useful feedback, not so great examples, etc.

Step 9: I returned the papers to their original authors to read through the feedback and revise their arguments.  Because I only had one paper per pair receive feedback, I had students work as pairs to brainstorm the best way to revise the original argument.  Then, as individuals, students filled in the last part of the template on their own paper.  Even if their argument did not receive any feedback, I thought that students had seen enough examples that would help them revise what they had originally written.

These are the final products of the two I shared above in Step 2 (notice that the paper that was not passed did not have written feedback):


Closing: There were essentially three main methods that students used to answer this question.  The first, and most common solution was to assign values to X and Y and then add those values together to determine the value of P.  The other two, which were very rare in each of my three classes, were first, identifying the distance (or length of the segment) between 0 and X and then adding that distance on to Y (in the positive direction), and second, speaking in more general terms about X and Y.  For example, a student might say that X and Y are both greater than 0, therefore their sum would also be greater than 0.  Furthermore, students might say that X is approximately one-half, and Y is greater than X, but less than 1, therefore their sum will be greater than 1, but less than 2.  All methods involve very different thinking, and I LOVE it!

Here are some samples of the various methods:

Assigning Values


Distance


Location


I took the time at the end of the lesson to show my students these three approaches, because I felt like there was not a lot of variety in the arguments that they got to read.  This was probably the greatest down side of this particular problem, because as a result, there was not a lot of rich discussion about alternate methods or solutions.  However, once I showed my students the less common methods, it was obvious that they appreciated the fact that there were other ways to do it.

Lastly, I wrote four words on the board, "Successes, Challenges, Liked, Learned".  I asked students to flip their papers over (the back of the template was blank) and write about any or all of these four topics.  What I realized was that they really valued the open ended nature of this activity, they admitted that giving feedback was difficult, but they hoped that we would do it again.  And oddly enough, when asked to write a reflection, nobody asked things like, "how long does it have to be?"

Here are some of my favorite reflections: Sorry for the light writing


Overall, I thought this was a really great way to start the year and it really set the tone for my expectations and my style of teaching.  If I were to do it all over again, the only thing I would really change is the task I chose.  I would prefer to use a task that elicited a wider variety of solutions from my students from the beginning.  That being said, this particular task has two other parts, one where students need to place points on the number line that represent Y - X and X - Y, and also X times Y.  Perhaps this could be a good follow-up task to try next week or later in the semester?